We humans are controlling creatures, aren’t we? All day long we try to control our surroundings to make them suit our needs. We control our car by steering it with our hands, and use our feet to make it go faster or slower. Control, control, control! That’s all we know.
No wonder then, when it comes to archery, we grab the bow and try to control it, try to send the arrow where we want it to go. First contradiction of archery: the more we try to control the bow, the less we succeed in doing so!
The bow then becomes a very good teacher for us. The bow teaches us that in order to succeed more often, we need to be with it, not against it. We just have to give up all that control; we have to avoid controlling the bow. We don’t shoot the arrow, the bow does.
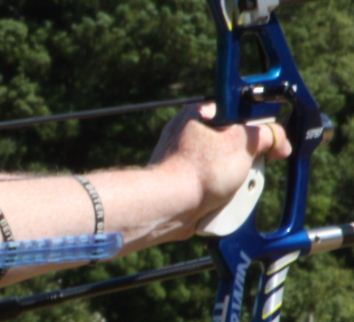
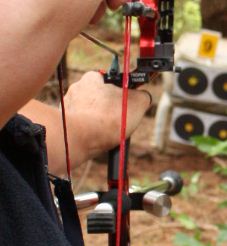
The shot both begins and ends with the bow hand placement. The bow hand is the first body part to touch the bow as you set up your shot, and the last body part to touch the bow as the arrow leaves for the target. This makes the bow hand placement on the handle (never a grip) extremely important. Your bow hand placement will determine whether you will try to control the shot or allow it to happen naturally. Remember that the principles for bow hand placement is much the same for both compound and recurve archery.
When most people start out in archery, they may grip the handle in some way or they stiffen their fingers and thumb in an effort to get consistency. Say it with me now… stop it! The purpose of the bow hand is to place it on the bow in a manner that allows the arm bones to resist the force loads that occur at full draw. It’s not just about your bow hand, it’s about bone alignment in your arm.
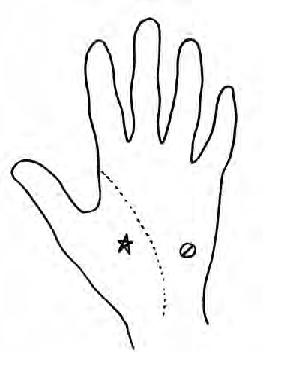
The life line that runs down the palm of your hand separates your hand into two regions for the purpose of archery (there is no other reason). It has two major muscle groups, the ‘in-bounds’ region or thumb pad (star) and the ‘out-of-bounds’ region or pinkie finger side (circle). They have big Latin names which I don’t care to pronounce.
The thumb pad is the only part of the palm that should be touching the handle. If any other part of the palm touches the handle then this may, and usually does, cause side torque. (Torque: verb – to cause to rotate or twist.)
The bow handle should be on the in-bound side of the life line, and knuckles relaxed at 45 degrees, which avoids the out-of-bound area of the hand and eliminates hand to handle torque. Your fingers and thumb should be completely relaxed.
If they are tense when you touch them to the handle, chances are they will stay tense through the entire shot. You do not need your fingers and thumb to hold the bow. Get yourself a finger sling from your local archery dealer, or make your own from a shoelace. This will allow the bow to jump from your relaxed hand on release of the string, but not to fall on the floor.
The wrist should be held in a medium-bend position. This minimizes the amount of muscle needed to support the wrist in the optimum position. Remember we are trying to position the bones of the bow arm to be in line e.g. bone on bone on bone.
The forearm has two bones, the shorter radius and the longer ulna. They lie side by side at the lower end of the arm to form the wrist joint. At this end the radius is larger, and is located on the thumb side of the wrist and forms the main part of the wrist joint. At the upper end, these two bones join to the humerus of the upper arm to form the elbow joint. When the radius is lined up with the humerus, they form a rigid resistance to the bow. If you can keep your front shoulder down then this resistance is anchored in you through bone on bone contact. Raise the shoulder and more muscle has to be recruited to resist the bow force and that’s not good. Shrugging your shoulders up and down gives you an easy example of high shoulders vs normal placement of shoulders.
When the knuckles are in a 45 degree angle, they allow the forearm to be rolled out of the way of the bow string. This doesn’t happen when you have your knuckles in a vertical position. This bone-on-bone contact, and the relaxed hand placement allows you to resist the force of the bow without using those muscles that always want to over-control the bow.
Here are a few steps that may help you place the hand on the bow properly:
- Put a pen mark on the lowest inch on the life line (bow hand) as a reference point
- Touch the pen mark to the left edge (right handed archer) of the bow handle
- Relax all fingers and thumb so they are limp
- Slide the bow hand upward until the knuckle of the index finger, and thumb lightly touch the arrow shelf
- Allow the thumb pad to settle comfortably onto the handle, roll the heel of your hand down a little if necessary
- Hold that pressure there with a pre draw, and through the entire shot sequence.
If you’re lucky like me, and you have a strategically placed freckle on the top side of your hand, then there is another quick and easy reference to line your hand up with the bow. For the rest of you pale faces, use a vivid marker.
Practice makes perfect. Try shooting at a blank target (less than 10 metres away) until you think you’ve got the hang of your hand position, then shoot some more until it gets boring, then you’ve got it! You are training your conscious mind to do just this one thing. Eventually your sub-conscious mind will take over the routine of hand placement, and you won’t have to think about it.
If you get the opportunity to do blind butt shooting, do it. Shooting with your eyes closed, at a close target, heightens all the senses, apart from sight, enabling you to “feel” the bow hand and the pressures which are applied when the bow is drawn.
It takes 20 days for humans to learn a new habit, so practice, practice, practice! Rome wasn’t built in a day.
Sarah Fuller
References: Larry Wise – Coaches Corner, Arrow Trade Magazine
Photos Karen Moffatt-McLeod
Article first appeared in issue 512, September/October 2012